“A ‘Lead Magnet’ is an offer (bribe, value) which you offer in return for an email subscription.”
Lead magnets have always been one of the most lucrative ways to get email subscribers. You might have seen this on all of the popular blogs or you might be offering one yourself.
In recent times, offering lead magnets within a blog post has been seen as leading to more targeted email-subscribers. I have personally tried it & it works great.
In this tutorial, I will show you how to offer a lead magnet using LeadPages within a blog post.
LeadPages is a great tool for bloggers & online marketers which will let you create landing pages (with zero technical skills), offer lead magnets for upgraded content (more on that later), SMS options, and many more amazing features. You can check out all the features by going to their homepage.
Check out Leadpages
I have started using LeadPages a lot in the last few weeks. I used LeadPages to create a lead magnet & earned 58 email subscribers in 48 hours with a conversion rate of 54% (which is remarkable).
In this guide, I will share how I created that lead magnet & offered it up using LeadPages.
The steps are easy to follow, but you need to pay attention (!!) as it may get confusing when you are using this for the first time.
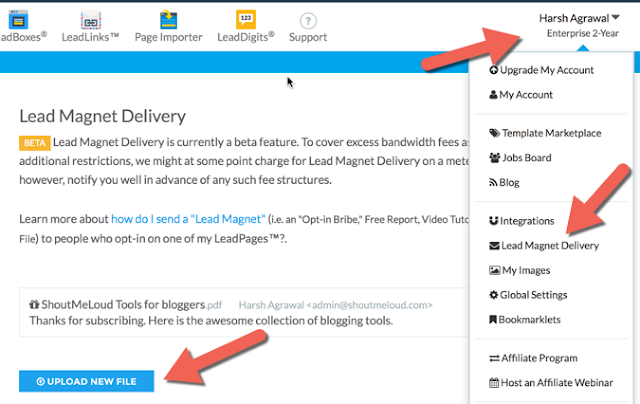
Click on “Upload New File” and upload the file that you want to offer as a lead magnet…
(Note: In this case I created a .pdf file of all 100+ blogging tools. I used Google Docs to create the file and used “export as a .pdf file” to create this specific lead magnet.)
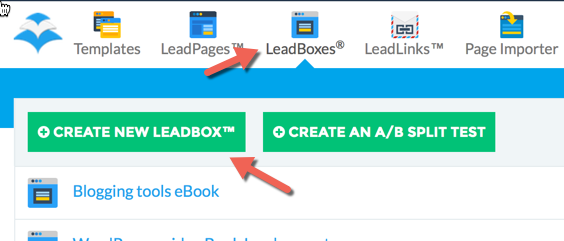
Once you have uploaded the file, click on “LeadBoxes” at the top. You can also use LeadPages to deliver the lead magnet, but in this case, our goal is to offer our lead magnet within the blog post.
Click on “Create New LeadBox”.
On the next page, start configuring your LeadBox like you normally do. Integrate it with your email provider, and remove the fields that you don’t need.
Tip: The email box without a name field converts better, but I prefer keeping the name field, as it helps me personalize the emails.
LeadPages can handle the delivery of your lead magnet, or you can create a customized email to be sent out with the lead magnet download link. The choice is yours, but to simplify use, use the lead magnet delivery option.
All you need to configure here is switching on the option that says “Send An Email After Someone Opts-in On This Leadbox”.
Now complete your form styling and click on “Save and Publish” at the top right.
Clicking on “Publish” will give you various option to integrate the new LeadBox in your blog. What you should be interested in is getting the direct link to offer the LeadBox.
Simply use that link as a hyperlink placed within your blog post asking people to opt-in to the lead magnet.
Here is how Brian Dean is doing this in his blog:
Don’t forget that these conversions are happening within the blog post and are hyper-targeted.
This was my first experience with offering a LeadMagnet within a blog post, and it worked great. If you haven’t yet started doing it, you should start right away.
In my case, I offered a .pdf of the same list, but in your case you can offer something extra. Maybe few more tools that are not listed, or a related eBook. The possibilities are endless, and you can use it to sky-rocket your email opt-in list for hyper-targeted subscribers.
Do let me know how you like the idea of offering a lead magnet within blog articles. Are you using this technique or planning to use it now? What other value propositions can we offer as a lead magnet within a blog post? Join the discussion in the comments below.
Lead magnets have always been one of the most lucrative ways to get email subscribers. You might have seen this on all of the popular blogs or you might be offering one yourself.
In recent times, offering lead magnets within a blog post has been seen as leading to more targeted email-subscribers. I have personally tried it & it works great.
In this tutorial, I will show you how to offer a lead magnet using LeadPages within a blog post.
LeadPages is a great tool for bloggers & online marketers which will let you create landing pages (with zero technical skills), offer lead magnets for upgraded content (more on that later), SMS options, and many more amazing features. You can check out all the features by going to their homepage.
Check out Leadpages
I have started using LeadPages a lot in the last few weeks. I used LeadPages to create a lead magnet & earned 58 email subscribers in 48 hours with a conversion rate of 54% (which is remarkable).
In this guide, I will share how I created that lead magnet & offered it up using LeadPages.
The steps are easy to follow, but you need to pay attention (!!) as it may get confusing when you are using this for the first time.
Configuring LeadPages to offer Lead Magnet:
Login to your LeadPages account, and click on the dropdown beside your name at the top right. Select “Lead Magnet Delivery”.Click on “Upload New File” and upload the file that you want to offer as a lead magnet…
(Note: In this case I created a .pdf file of all 100+ blogging tools. I used Google Docs to create the file and used “export as a .pdf file” to create this specific lead magnet.)
Once you have uploaded the file, click on “LeadBoxes” at the top. You can also use LeadPages to deliver the lead magnet, but in this case, our goal is to offer our lead magnet within the blog post.
Click on “Create New LeadBox”.
On the next page, start configuring your LeadBox like you normally do. Integrate it with your email provider, and remove the fields that you don’t need.
Tip: The email box without a name field converts better, but I prefer keeping the name field, as it helps me personalize the emails.
LeadPages can handle the delivery of your lead magnet, or you can create a customized email to be sent out with the lead magnet download link. The choice is yours, but to simplify use, use the lead magnet delivery option.
All you need to configure here is switching on the option that says “Send An Email After Someone Opts-in On This Leadbox”.
Now complete your form styling and click on “Save and Publish” at the top right.
Clicking on “Publish” will give you various option to integrate the new LeadBox in your blog. What you should be interested in is getting the direct link to offer the LeadBox.
Simply use that link as a hyperlink placed within your blog post asking people to opt-in to the lead magnet.
Here is how Brian Dean is doing this in his blog:
Don’t forget that these conversions are happening within the blog post and are hyper-targeted.
This was my first experience with offering a LeadMagnet within a blog post, and it worked great. If you haven’t yet started doing it, you should start right away.
In my case, I offered a .pdf of the same list, but in your case you can offer something extra. Maybe few more tools that are not listed, or a related eBook. The possibilities are endless, and you can use it to sky-rocket your email opt-in list for hyper-targeted subscribers.
Do let me know how you like the idea of offering a lead magnet within blog articles. Are you using this technique or planning to use it now? What other value propositions can we offer as a lead magnet within a blog post? Join the discussion in the comments below.
Source.....shoutmeloud


0 comments:
Post a Comment