Migrating an email list from one service to another is not as simple as it seems. You need be very careful of certain factors to ensure that you don’t miss anything.
A few days back I talked about this new email marketing service (EMS) called ConvertKit & told you that I’m currently changing my EMS from Aweber to Convertkit.
Many of our regular readers asked us to document the whole process so that it would be easier for them too to do the same. Well, here it is.
I’m now sharing with you the complete process of how to move your entire email list from Aweber to ConvertKit.
I have also made a video that will help you understand the process better.
- The video is embedded at the bottom of this tutorial.
Moving Email List from Aweber to ConvertKit:
Here is an overview of the necessary steps:
1. Export the email list in .csv format on Aweber
2. Create a new tag with the same list name on ConvertKit
3. Import the list to ConvertKit & map the rows
Depending upon the size of your email list, it will take some time (potentially hours) to complete the entire process.
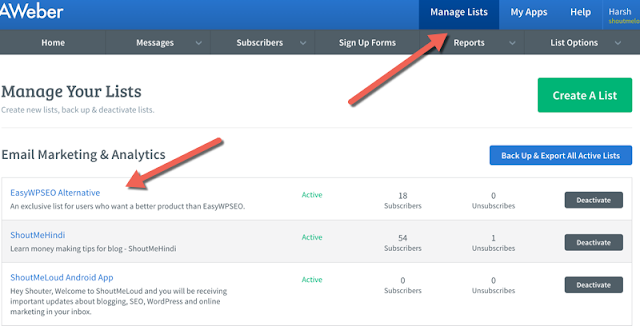
Firstly, login to your Aweber dashboard & click on “Manage Lists” at the top. Then, click on the list that you wish to export.
On the next page, click on Subscribers > Manage Subscribers.
You can start right away exporting your list from here.
But before you do that, I suggest you clean your email list. Remove those subscribers who haven’t interacted with your emails in the last few months. If you are sending out emails regularly, remove people with over 5-6 months of inactivity.
- I have explained the process of cleaning & shared some information about why to remove inactive users in the above video. Do watch it, as it will help you make the most out of your email marketing strategies.
Once you have cleaned up your list, click on “Filters” on the left side & select “Currently Subscribed”.
This will bring up your refined list & it only includes subscribers who have confirmed their email addresses. At the bottom, you will find the option to “Export CSV,” click on it & your email list will be exported.
But before you start importing your email list to ConvertKit, you need to clean up the “unwanted columns”. These columns are things like “last follow-up”, “date added”, “ad tracking”, and many others field that you don’t require. So get rid of them.
The only thing left to do is delete that list on Aweber.
- IMPORTANT: You should do that only after successfully importing your list to ConvertKit.
This step will complete the Aweber portion of this tutorial.
Now, login to your new ConvertKit dashboard & follow the steps mentioned below.
Importing Email List to ConvertKit
One common question that you will have is, “Should I use segments, forms, or tags to import the list?” Well, this is where ConvertKit gets interesting & many people make mistakes in this part of the transition.You should use tags to import a list. This way, it will be easier for you to manage & add marketing automation. I will explain this process in the next guide, but for now, let’s finish importing.
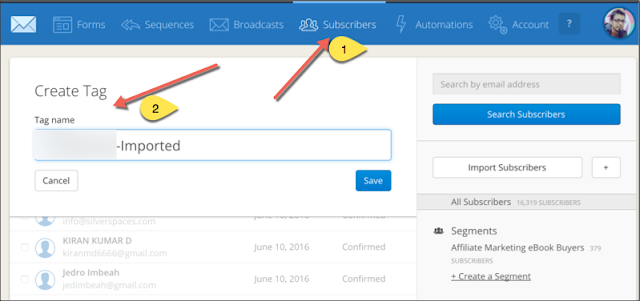
Click on Subscribers > Create Tag.
Give the tag a meaningful name. Something that helps you to easily identify your list.
Click on “Save”.
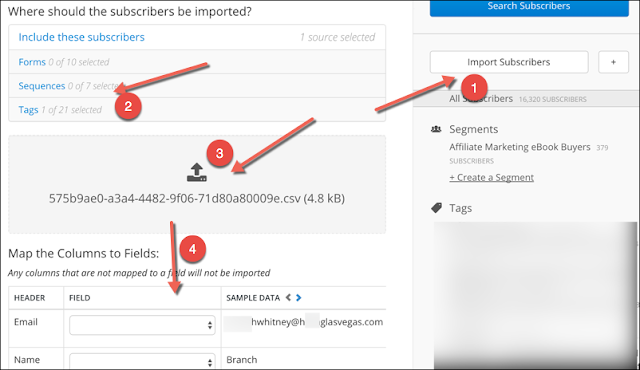
Next, click on “Import Subscribers” on the right column, select the tags that you just created & drop your .csv file in the drop area.
The last step is to map the Columns to Fields.
Once you have done that, click on “Import Subscribers” at the bottom & the ConvertKit Importer will take care of the rest.
You will get an email once the import is done. In my case, it only took about one minute.
That’s it!
Now you can verify 1-2 users by going to “Subscribers” & search for 1-2 emails or names that you have in exported your .csv file. This is just to ensure that your list has been migrated properly. (I know this step is not so important, but honestly, I’m little paranoid when it comes to the integrity of my data.)
This is the same process if you’re importing a list from any other email services like GetResponse, InfusionSoft, or any other. One thing that you should also do is import your sequence from Aweber to ConvertKit. I will share a guide on “Sequence in ConvertKit” in an upcoming post.
As I mentioned before, here is the video tutorial:
Are you planning to migrate your email list to ConvertKit? Have you already started? Do share your experience & any tips you would like to add about the process. I look forward to your comments!
Source.....shoutmeloud


0 comments:
Post a Comment